Apache Airflow
Apache Airflow is an open source tool for programmatically authoring, scheduling, and monitoring data pipelines. It has over 9 million downloads per month and an active OSS community. Airflow allows data practitioners to define their data pipelines as Python code in a highly extensible and infinitely scalable way.
Airflow pipelines are defined as DAGs using Python code in DAG files. Each DAG file typically defines one DAG, which describes the different tasks and their dependencies. Besides this, the DAG also defines a schedule interval that determines when the DAG is executed by Airflow. One advantage of defining Airflow DAGs in Python code is that this programmatic approach provides you with a lot of flexibility for building DAGs. This flexibility gives a great deal of customization in how you build your pipelines, allowing you to fit Airflow to your needs for building arbitrarily complex pipelines. In addition to this flexibility, another advantage of Airflow’s Python foundation is that tasks can execute any operation that you can implement in Python. Over time, this has led to the development of many Airflow extensions that enable you to execute tasks across a wide variety of systems, including external databases, big data technologies, and various cloud services, allowing you to build complex data pipelines bringing together data processes across many different systems.
History
Airflow started as an open source project at Airbnb. In 2015, Airbnb was growing rapidly and struggling to manage the vast quantities of internal data it generated every day. Airbnb data engineers, data scientists, and analysts had to regularly write scheduled batch jobs to automate processes. To satisfy the need for a robust scheduling tool, Maxime Beauchemin created Airflow to allow Airbnb to quickly author, iterate, and monitor batch data pipelines.
Airflow has come a long way since Maxime's first commit. The project joined the official Apache Foundation Incubator in April of 2016, and graduated as a top-level project in January 2019. As of August 2022 Airflow has over 2,000 contributors, 16,900 commits and 26,900 stars on GitHub.
On December 17th 2020, Airflow 2.0 was released, bringing with it major upgrades and powerful new features. Airflow is used by thousands of data engineering teams around the world and adoption continues to accelerate as the community grows stronger.
Why use Airflow
Apache Airflow is a platform for programmatically authoring, scheduling, and monitoring workflows. It is especially useful for creating and orchestrating complex data pipelines.
Data orchestration sits at the heart of any modern data stack and provides elaborate automation of data pipelines. With orchestration, actions in your data pipeline become aware of each other and your data team has a central location to monitor, edit, and troubleshoot their workflows.
Airflow provides many benefits, including:
- Dynamic data pipelines: In Airflow, pipelines are defined as Python code. Anything you can do in Python, you can do in Airflow.
- CI/CD for data pipelines: With all the logic of your workflows defined in Python, it is possible to implement CI/CD processes for your data pipelines.
- Tool agnosticism: Airflow can connect to any application in your data ecosystem that allows connections through an API.
- High extensibility: For many commonly used data engineering tools, integrations exist in the form of provider packages, which are routinely extended and updated.
- Infinite scalability: Given enough computing power, you can orchestrate as many processes as you need, no matter the complexity of your pipelines.
- Visualization: The Airflow UI provides an immediate overview of your data pipelines.
- Stable REST API: The Airflow REST API allows Airflow to interact with RESTful web services.
- Ease of use: With the Airflow CLI, you can run a local Airflow environment with only three bash commands.
- Active and engaged OSS community: With millions of users and thousands of contributors, Airflow is here to stay and grow.
When to use Airflow
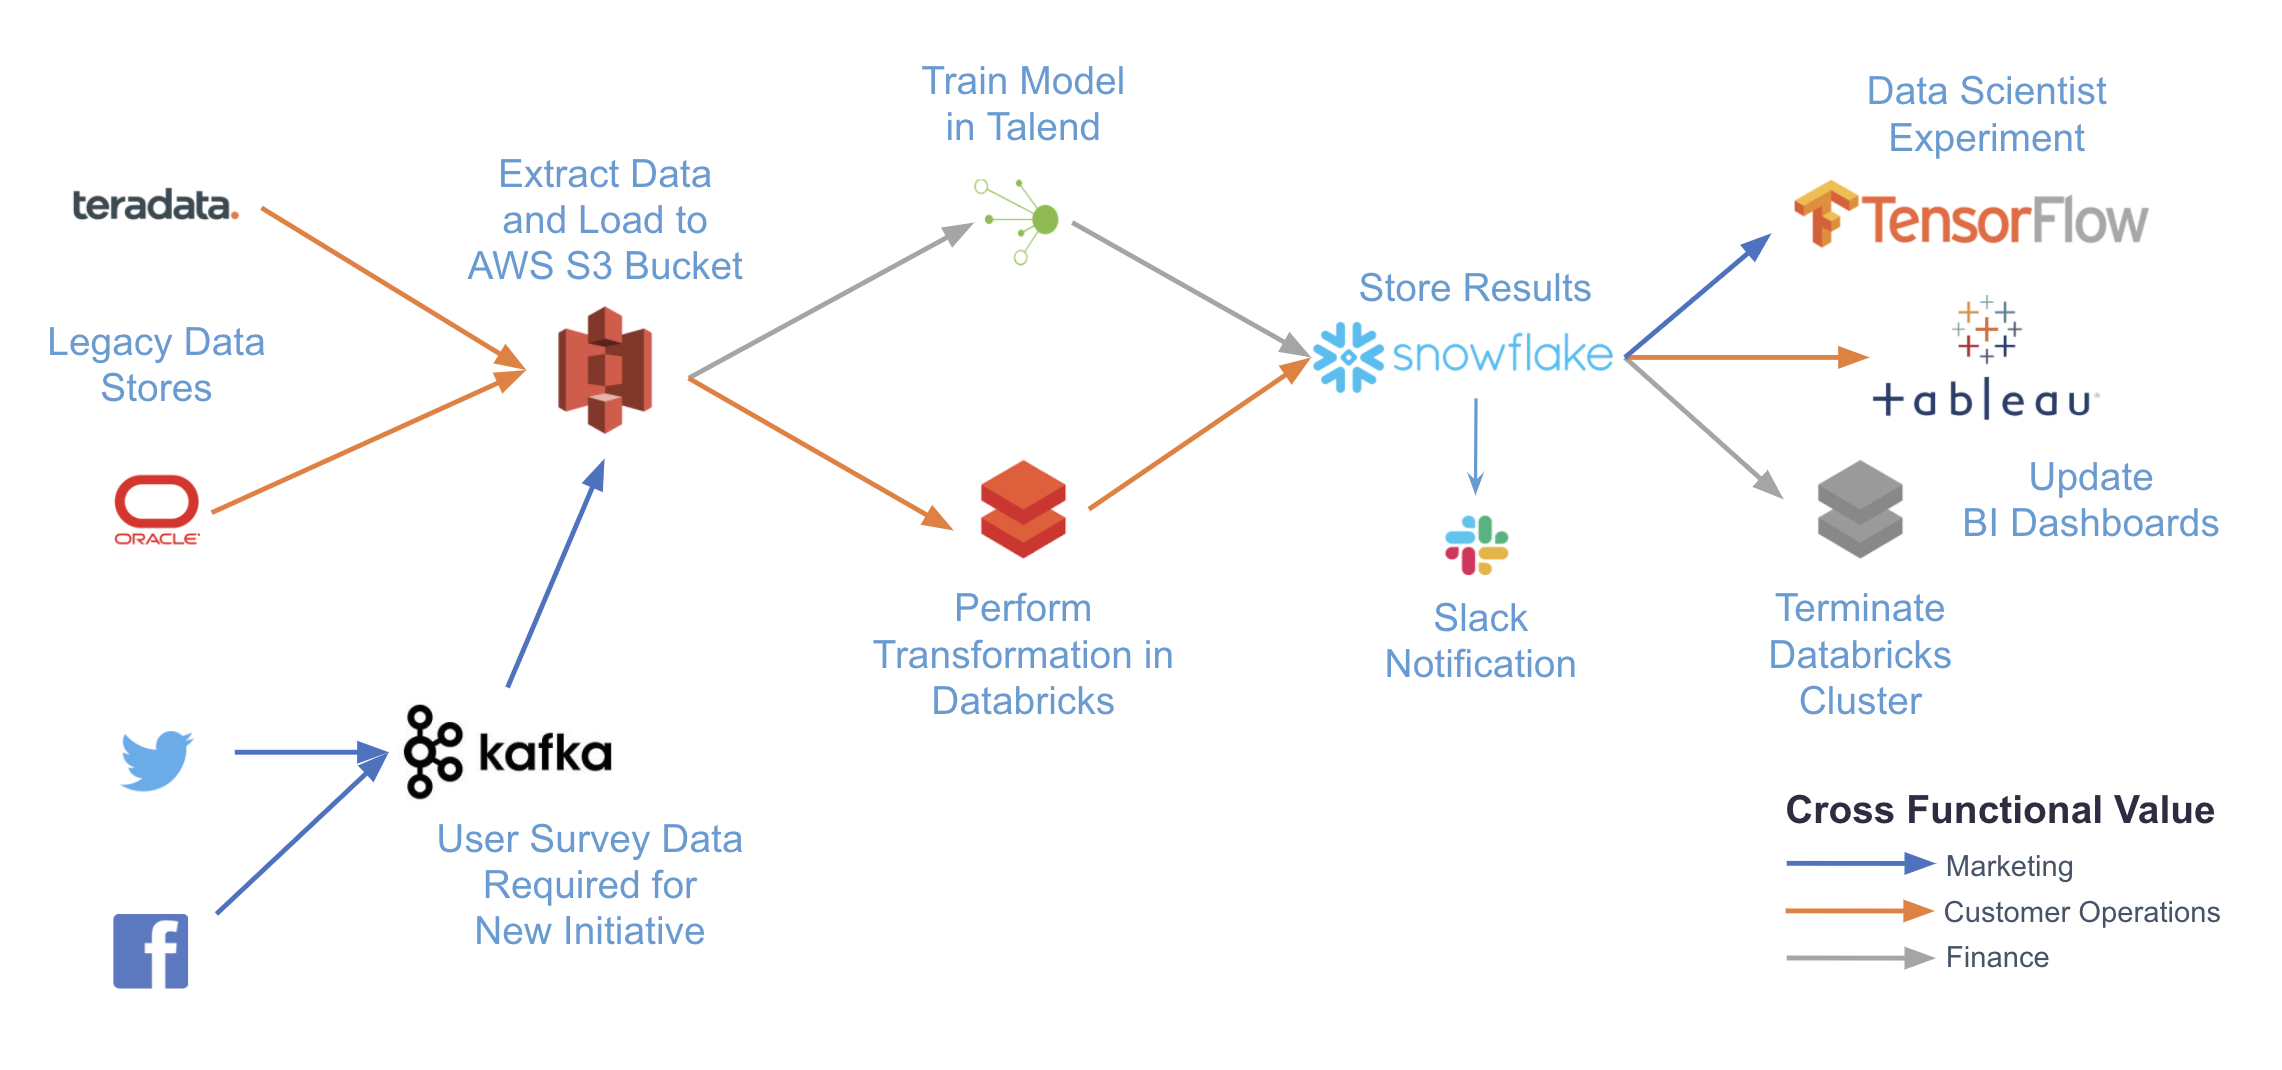
Airflow can be used for almost any batch data pipeline, and there are a significant number of documented use cases in the community. Because of its extensibility, Airflow is particularly powerful for orchestrating jobs with complex dependencies in multiple external systems.
The following diagram illustrates a complex use case that can be accomplished with Airflow. By writing pipelines in code and using Airflow providers, you can integrate with any number of different systems with just a single platform for orchestration and monitoring.
Some common use cases of Airflow include:
- ETL/ELT pipelines: For example, running a write, audit, publish pattern on data in Snowflake as shown in Orchestrating Snowflake Queries with Airflow.
- MLOps: For example, using Airflow with Tensorflow and MLFlow as shown in Using Airflow with Tensorflow and MLFlow.
- Operationalized analytics: For example, orchestrating a pipeline to extract insights from your data and display them in dashboards as shown in Using Airflow as a Data Analyst.
Core Airflow concepts
To navigate Airflow resources, it is helpful to have a general understanding of the following core Airflow concepts:
- DAG: Directed Acyclic Graph. An Airflow DAG is a workflow defined as a graph, where all dependencies between nodes are directed and nodes do not self-reference. For more information on Airflow DAGs, see Introduction to Airflow DAGs.
- DAG run: The execution of a DAG at a specific point in time. A DAG run can be scheduled or manually triggered.
- Task: A step in a DAG describing a single unit of work.
- Task instance: The execution of a task at a specific point in time.
When authoring DAGs, you use operators. An operator is an abstraction over Python code designed to perform a specific action and takes the form of a function that accepts parameters. Each operator in your DAG code corresponds to one Airflow task.
The following are the primary operator categories:
- Action operators: Execute a function. For example, the PythonOperator or the BashOperator.
- Transfer operators: Move data from a source to a destination. For example, the S3ToRedshiftOperator.
- Sensors: Wait for something to happen. For example, the ExternalTaskSensor or the HttpSensorAsync.
While operators are defined individually, they can pass information to each other by using XComs.
Some commonly used action operators such as the PythonOperator are part of core Airflow and are automatically installed in your Airflow instance. Operators used to interact with external systems are maintained separately to Airflow in provider packages.
Providers are packages that are maintained by the community and include all of the core operators, hooks, and sensors for a given service, for example:
- Amazon provider
- Snowflake provider
- Google provider
- Azure provider
- Databricks provider
- Fivetran provider
Airflow components
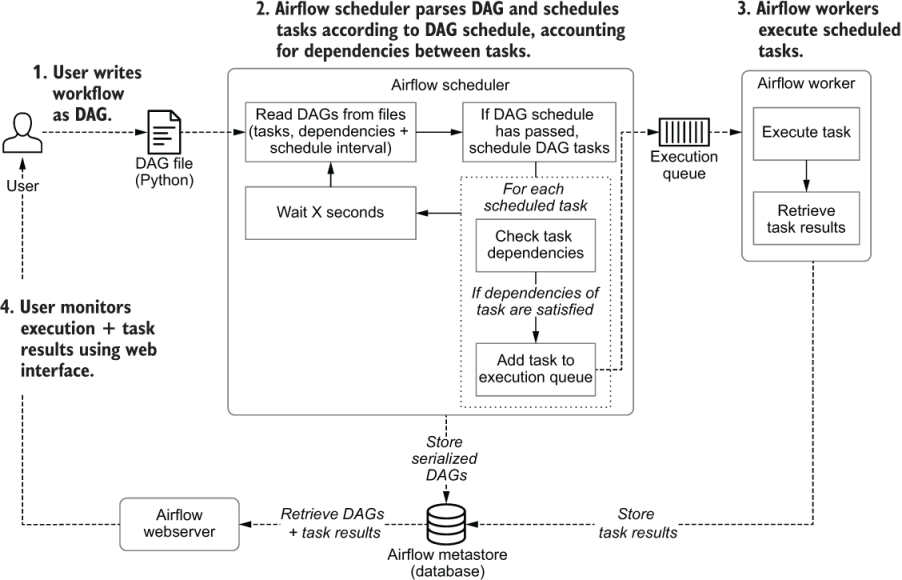
When working with Airflow, it is important to understand the underlying components of its infrastructure. Knowing which components are available and their purpose can help you develop your DAGs, troubleshoot issues, and run Airflow successfully.
The following Airflow components must be running at all times:
- Webserver: A Flask server running with Gunicorn that serves the Airflow UI.
- Scheduler: A Daemon responsible for scheduling jobs. This is a multi-threaded Python process that determines what tasks need to be run, when they need to be run, and where they are run.
- Database: A database where all DAG and task metadata are stored. This is typically a Postgres database, but MySQL, MsSQL, and SQLite are also supported.
- Executor: The mechanism that defines how the available computing resources are used to execute tasks. An executor is running within the scheduler whenever Airflow is up.
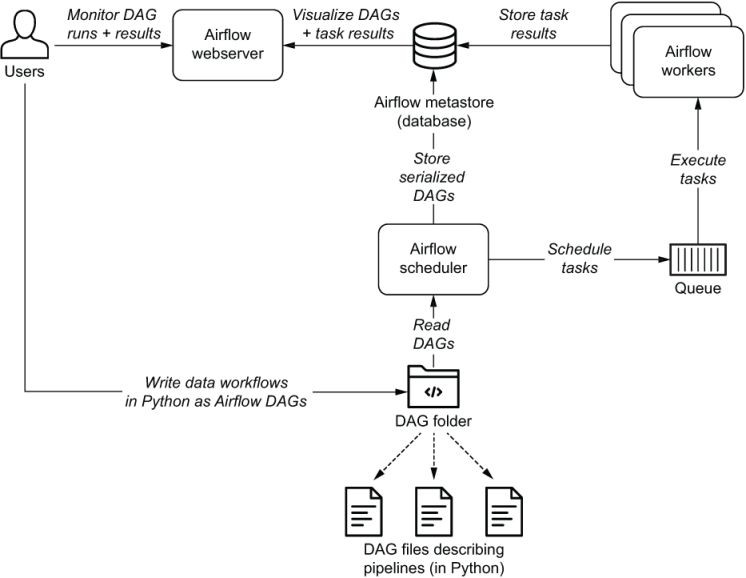
Additionally, you may also have the following situational components:
- Triggerer: A separate process which supports deferrable operators. This component is optional and must be run separately.
- Worker: The process that executes tasks, as defined by the executor. Depending on which executor you choose, you may or may not have workers as part of your Airflow infrastructure.
DAGs
In Airflow, data pipelines are defined in Python code as directed acyclic graphs, also known as DAGs. Within a graph, each node represents a task which completes a unit of work, and each edge represents a dependency between tasks.
In Airflow, a directed acyclic graph (DAG) is a data pipeline defined in Python code. Each DAG represents a collection of tasks you want to run and is organized to show relationships between tasks in the Airflow UI. The mathematical properties of DAGs make them useful for building data pipelines:
- Directed: If multiple tasks exist, then each task must have at least one defined upstream or downstream task.
- Acyclic: Tasks cannot have a dependency to themselves. This avoids infinite loops.
- Graph: All tasks can be visualized in a graph structure, with relationships between tasks defined by nodes and vertices.
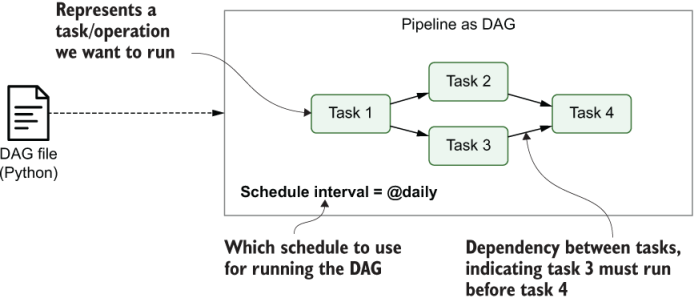
Aside from these requirements, DAGs in Airflow can be defined however you need! They can have a single task or thousands of tasks arranged in any number of ways.
An instance of a DAG running on a specific date is called a DAG run. DAG runs can be started by the Airflow scheduler based on the DAG's defined schedule, or they can be started manually.
The Airflow UI
The DAGs view is the landing page when you sign in to Airflow. It shows a list of all your DAGs, the status of recent DAG runs and tasks, the time of the last DAG run, and basic metadata about the DAG like the owner and the schedule.
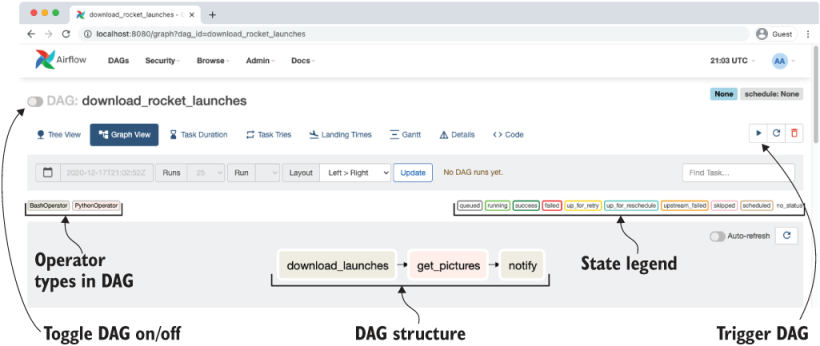
In the DAGs view you can:
- Pause/unpause a DAG with the toggle to the left of the DAG name.
- Filter the list of DAGs to show active, paused, or all DAGs.
- Trigger, refresh, or delete a DAG with the buttons in the Actions section.
- Navigate quickly to other DAG-specific pages from the Links section.
The Graph view shows a visualization of the tasks and dependencies in your DAG and their current status for a specific DAG run. This view is particularly useful when reviewing and developing a DAG. When running the DAG, toggle Auto-refresh to see the status of the tasks update in real time.
Specifically, the additional views available are:
- Task Instance Details: Shows the fully rendered task - an exact summary of what the task does (attributes, values, templates, etc.).
- Rendered Template: Shows the task's metadata after it has been templated.
- Log: Shows the logs of that particular TaskInstance.
- XCom: Shows XComs created by that particular TaskInstance.
- List Instances, all runs: Shows a historical view of task instances and statuses for that particular task.
- Filter Upstream: Updates the Graph View to show only the task selected and any upstream tasks.
The actions available for the task instance are:
- Run: Manually runs a specific task in the DAG. You have the ability to ignore dependencies and the current task state when you do this.
- Clear: Removes that task instance from the metadata database. This is one way of manually re-running a task (and any downstream tasks, if you choose). You can choose to also clear upstream or downstream tasks in the same DAG, or past or future task instances of that task.
- Mark Failed: Changes the task's status to failed. This will update the metadata database and stop downstream tasks from running if that is how you have defined dependencies in your DAG. You have additional capabilities for marking past and future task instances as failed and for marking upstream or downstream tasks as failed at the same time.
- Mark Success: Changes the task's status to success. This will update the metadata database and allow downstream tasks to run if that is how you have defined dependencies in your DAG. You have additional capabilities for marking past and future task instances as successful and for marking upstream or downstream tasks as successful at the same time.
The Grid view was introduced in Airflow 2.3 and shows a grid representation of the DAG's previous runs, including their duration and the outcome of all individual task instances. Each column represents a DAG run and each square represents a task instance in that DAG run. Task instances are color-coded according to their status. A small play icon on a DAG run indicates that a run was triggered manually, and a small dataset icon shows that a run was triggered via a dataset update.
Click a square in the grid to view more details about the task instance and access links to additional views and actions.
The Calendar view is available in Airflow 2.1 and later. It shows the state of DAG runs overlaid on a calendar. States are represented by color. If there were multiple DAG runs on the same day with different states, the color is a gradient between green (success) and red (failure).
The Code view shows the code that is used to generate the DAG. While your code should live in source control, the Code view provides a quick insight into what is going on in the DAG. DAG code can't be edited in the UI.
This view shows code only from the file that generated the DAG. It does not show any code that may be imported in the DAG, such as custom hooks or operators or code in your /include directory.
The following are the additional DAG views that are available, but not discussed in this guide:
- Task Duration: Shows a line graph of the duration of each task over time.
- Task Tries: Shows a line graph of the number of tries for each task in a DAG run over time.
- Landing Times: Shows a line graph of the time of day each task started over time.
- Gantt: Shows a Gantt chart with the duration of each task for the chosen DAG run.
- Details: Shows details of the DAG configuration and DagModel debug information.
- Audit Log: Shows selected events for all DAG runs.
Airflow scheduling and timetables
One of the fundamental features of Apache Airflow is the ability to schedule jobs. Historically, Airflow users scheduled their DAGs by specifying a schedule with a cron expression, a timedelta object, or a preset Airflow schedule. Timetables, released in Airflow 2.2, allow users to create their own custom schedules using Python, effectively eliminating the limitations of cron. With timetables, you can now schedule DAGs to run at any time. Datasets, introduced in Airflow 2.4, let you schedule your DAGs on updates to a dataset rather than a time-based schedule.
The following parameters ensure your DAGs run at the correct time:
- data_interval_start: Defines the start date and time of the data interval. A DAG's timetable will return this parameter for each DAG run. This parameter is created automatically by Airflow, or is specified by the user when implementing a custom timetable.
- data_interval_end: Defines the end date and time of the data interval. A DAG's timetable will return this parameter for each DAG run. This parameter is created automatically by Airflow, or is specified by the user when implementing a custom timetable.
- schedule: Defines when a DAG will be run. This value is set at the DAG configuration level. It accepts cron expressions, timedelta objects, timetables, and lists of datasets.
- start_date: The first date your DAG will be executed. This parameter is required for your DAG to be scheduled by Airflow.
- end_date: The last date your DAG will be executed. This parameter is optional.
Defining scheduling intervals
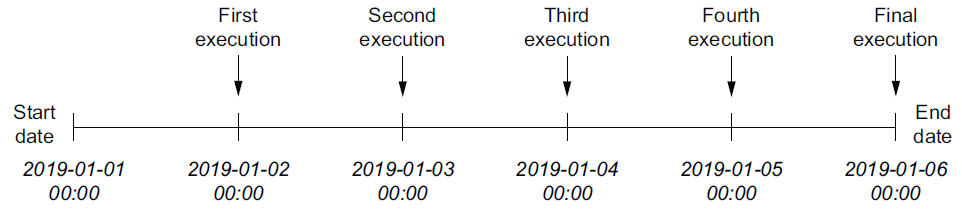
dag = DAG(
    dag_id="03_with_end_date",
    schedule_interval="@daily",
    start_date=dt.datetime(year=2019, month=1, day=1),
    end_date=dt.datetime(year=2019, month=1, day=5),
)
This will result in the full set of schedule intervals:
Cron-based intervals
To support more complicated scheduling intervals, Airflow allows us to define scheduling intervals using the same syntax as used by cron, a time-based job scheduler used by Unix-like computer operating systems such as macOS and Linux. This syntax consists of five components and is defined as follows:
# ┌─────── minute (0 - 59)
# │ ┌────── hour (0 - 23)
# │ │ ┌───── day of the month (1 - 31)
# │ │ │ ┌───── month (1 - 12)
# │ │ │ │ ┌──── day of the week (0 - 6) (Sunday to Saturday;
# │ │ │ │ │      7 is also Sunday on some systems)
# * * * * *
Although this cron-based representation may seem a bit convoluted, it provides us with considerable flexibility for defining time intervals:
0 * * * * = hourly (running on the hour)
0 0 * * * = daily (running at midnight)
0 0 * * 0 = weekly (running at midnight on Sunday)
0 0 1 * * = midnight on the first of every month
45 23 * * SAT = 23:45 every Saturday
0 0 * * MON,WED,FRI = run every Monday, Wednesday, Friday at midnight
0 0 * * MON-FRI = run every weekday at midnight
0 0,12 * * * = run every day at 00:00 and 12:00
Airflow also provides support for several macros that represent shorthand for commonly used scheduling intervals:
| @once | Schedule once and only once. |
|---|---|
| @hourly | Run once an hour at the beginning of the hour. |
| @daily | Run once a day at midnight. |
| @weekly | Run once a week at midnight on Sunday morning. |
| @monthly | Run once a month at midnight on the first day of the month. |
| @yearly | Run once a year at midnight on January 1. |
Frequency-based intervals
An important limitation of cron expressions is that they are unable to represent certain frequency-based schedules. For example, how would you define a cron expression that runs a DAG once every three days? It turns out that you could write an expression that runs on every first, fourth, seventh, and so on day of the month, but this approach would run into problems at the end of the month as the DAG would run consecutively on both the 31st and the first of the next month, violating the desired schedule.
This limitation of cron stems from the nature of cron expressions, as they define a pattern that is continuously matched against the current time to determine whether a job should be executed. This has the advantage of making the expressions stateless, meaning that you don’t have to remember when a previous job was run to calculate the next interval. However, as you can see, this comes at the price of some expressiveness.
What if we really want to run our DAG once every three days? To support this type of frequency-based schedule, Airflow also allows you to define scheduling intervals in terms of a relative time interval. To use such a frequency-based schedule, you can pass a timedelta instance (from the datetime module in the standard library) as a schedule interval.
dag = DAG(
    dag_id="04_time_delta",
    schedule_interval=dt.timedelta(days=3),
    start_date=dt.datetime(year=2019, month=1, day=1),
    end_date=dt.datetime(year=2019, month=1, day=5),
)
This would result in our DAG being run every three days following the start date (on the 4th, 7th, 10th, and so on of January 2019). Of course, you can also use this approach to run your DAG every 10 minutes (using timedelta(minutes=10)) or every two hours (using timedelta(hours=2)).
Key concepts
Catchup
You can use the built-in catchup DAG argument to process data starting a year ago.
When the catchup parameter for a DAG is set to True, at the time the DAG is turned on in Airflow the scheduler starts a DAG run for every data interval that has not been run between the DAG's start_date and the current data interval. For example, if your DAG is scheduled to run daily and has a start_date of 1/1/2021, and you deploy that DAG and turn it on 2/1/2021, Airflow will schedule and start all of the daily DAG runs for January. Catchup is also triggered when you turn a DAG off for a period and then turn it on again.
Catchup can be controlled by setting the parameter in your DAG's arguments. By default, catchup is set to True. This example DAG doesn't use catchup:
with DAG(
    dag_id="example_dag",
    start_date=datetime(2021, 10, 9),
    max_active_runs=1,
    timetable=UnevenIntervalsTimetable(),
    default_args={
        "retries": 1,
        "retry_delay": timedelta(minutes=3),
    },
    catchup=False
) as dag:
Catchup is a powerful feature, but it should be used with caution. For example, if you deploy a DAG that runs every 5 minutes with a start date of 1 year ago and don't set catchup to False, Airflow will schedule numerous DAG runs all at once. When using catchup, keep in mind what resources Airflow has available and how many DAG runs you can support at one time. To avoid overloading your scheduler or external systems, you can use the following parameters in conjunction with catchup:
- max_active_runs: Set at the DAG level and limits the number of DAG runs that Airflow will execute for that particular DAG at any given time. For example, if you set this value to 3 and the DAG had 15 catchup runs to complete, they would be executed in 5 chunks of 3 runs.
- depends_on_past: Set at the task level or as a default_arg for all tasks at the DAG level. When set to True, the task instance must wait for the same task in the most recent DAG run to be successful. This ensures sequential data loads and allows only one DAG run to be executed at a time in most cases.
- wait_for_downstream: Set at the DAG level and similar to a DAG-level implementation of depends_on_past. The entire DAG needs to run successfully for the next DAG run to start.
- catchup_by_default: Set at the Airflow level in your airflow.cfg or as an environment variable. If you set this parameter to False all DAGs in your Airflow environment will not catchup unless you turn it on.
If you want to deploy your DAG with catchup enabled but there are some tasks you don't want to run during the catchup, you can use the LatestOnlyOperator in your DAG. This operator only runs during the DAG's most recent scheduled interval. In every other DAG run it is ignored, along with any tasks downstream of it.
Backfill
Backfilling lets you use a DAG to process data prior to the DAG's start date. Backfilling is the concept of running a DAG for a specified historical period. Unlike catchup, which triggers missed DAG runs from the DAG's start_date through the current data interval, backfill periods can be specified explicitly and can include periods prior to the DAG's start_date.
Backfilling can be accomplished in Airflow using the CLI by specifying the DAG ID and the start and end dates for the backfill period. This command runs the DAG for all intervals between the start date and end date. DAGs in your backfill interval are still rerun even if they already have DAG runs. For example:
airflow dags backfill [-h] [-c CONF] [--delay-on-limit DELAY_ON_LIMIT] [-x]
                      [-n] [-e END_DATE] [-i] [-I] [-l] [-m] [--pool POOL]
                      [--rerun-failed-tasks] [--reset-dagruns] [-B]
                      [-s START_DATE] [-S SUBDIR] [-t TASK_REGEX] [-v] [-y]
                      dag_id
For example, airflow dags backfill -s 2021-11-01 -e 2021-11-02 example_dag backfills example_dag from November 1st-2nd 2021.
When using backfill keep the following considerations in mind:
- Consider your available resources. If your backfill will trigger many DAG runs, you might want to add some of the catchup parameters to your DAG.
- Clearing the task or DAG status of a backfilled DAG run does not rerun the task or DAG.
Alternatively, you can deploy a copy of the DAG with a new name and a start date that is the date you want to backfill to. Airflow will consider this a separate DAG so you won't see all the DAG runs and task instances in the same place, but it would accomplish running the DAG for data in the desired time period. If you have a small number of DAG runs to backfill, you can trigger them manually from the Airflow UI and choose the desired logical date.
Import custom hooks and operators
One of the great benefits of Airflow is its vast network of provider packages that provide hooks, operators, and sensors for many common use cases. Another great benefit of Airflow is that it is highly customizable because everything is defined in Python code. If a hook, operator, or sensor you need doesn't exist in the open source, you can easily define your own.
At a high level, creating a custom operator is straightforward. At a minimum, all custom operators must:
- Inherit from the BaseOperator.
- Define Constructor and Execute classes.
The code appears similar to the following:
from airflow.models.baseoperator import BaseOperator
from airflow.utils.decorators import apply_defaults
from hooks.my_hook import MyHook


class MyOperator(BaseOperator):

    @apply_defaults
    def __init__(self,
                 my_field,
                 *args,
                 **kwargs):
        super(MyOperator, self).__init__(*args, **kwargs)
        self.my_field = my_field

    def execute(self, context):
        hook = MyHook('my_conn')
        hook.my_method()
If your custom operator is modifying functionality of an existing operator, your class can inherit from the operator you are building on instead of the BaseOperator.
After you've defined your custom operator, you need to make it available to your DAGs. Some legacy Airflow documentation or forums may reference registering your custom operator as an Airflow plugin, but this is not necessary. To import a custom operator into your DAGs, the file containing your custom operator needs to be in a directory that is present in your PYTHONPATH.
By default, Airflow adds the dags/ and plugins/ directories in a project to the PYTHONPATH, so those are the most natural choices for storing custom operator files (check out the Apache Airflow Module Management docs for more info). Your project structure may vary depending on your team and your use case. Astronomer uses the following structure, where custom operator files live in the plugins/ directory with sub-folders for readability.
.
├── dags/
│   ├── example-dag.py
├── Dockerfile
├── include/
│   └── sql/
│       └── transforms.sql
├── packages.txt
├── plugins/
│   └── operators/
│       └── my_operator.py
│   └── sensors/
│       └── my_sensor.py
└── requirements.txt
After you've added your custom operators to the project, you can import them into your DAG like you would any other Python package:
from airflow import DAG
from datetime import datetime, timedelta
from operators.my_operator import MyOperator
from sensors.my_sensor import MySensor

default_args = {
    'owner': 'airflow',
    'depends_on_past': False,
    'start_date': datetime(2018, 1, 1),
    'email_on_failure': False,
    'email_on_retry': False,
    'retries': 1,
    'retry_delay': timedelta(minutes=5),
}


with DAG('example_dag',
         max_active_runs=3,
         schedule_interval='@once',
         default_args=default_args) as dag:

    sens = MySensor(
        task_id='taskA'
    )

    op = MyOperator(
        task_id='taskB',
        my_field='some text'
    )

    sens >> op
And that's it! Your DAG will use MyOperator and MySensor when it runs, giving you full flexibility over what happens in your pipelines.
Explore further
- Getting Started with Airflow
- Airflow Scheduling
- Intro To Data Orchestration With Airflow
- Operating data pipeline using Airflow @ Slack
- Running Apache Airflow At Lyft
- How Jellysmack Pushed Data Science Jobs Orchestration to a Production-ready Level
- Managing Billions of Data Points: Evolution of Workflow Management at Groupon using Airflow